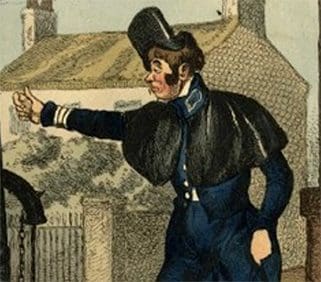
This quick activity asks students to explore the detail in Rowlandson’s cartoon called ‘Amputation’. They score one mark for each of the 10 labelled examples of relevant detail and 3 marks each for good inferences. If they can explain the purpose of the cartoon they score an extra 5. First to 20 wins. Accompanying PowerPoint, supported by teacher notes which give you all the detail you need to impress even the most able students!
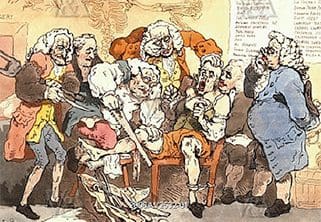
Ideas for milking the meaning from Rowlandson’s carton Amputation
There is a lot in this cartoon that students don’t spot on first looking at it. The central image is clear enough, but some students need to look at the peripheral detail. Why is this so important? Well, students need to get into the habit of seeing cartoons, such as this, as conveying the author’s opinion rather than a medium for providing information. So every detail has been included for a reason, and all link to the central purpose of the source. This cartoon offers an uncompromising view of the surgeons’ practice and its probable outcome.
Only by looking closely at the range of detail included can students gain a clear understanding of the cartoonist’s, message and intention.
To make the activity of dissecting the cartoon a bit more fun, I get the students in groups of 3 to see who can get to 20 marks first. They gain 1 mark for every point spotted correctly, but 3 each for 10, 7 and 1. They get 5 if they get the significance of A. So you can get to 20 by getting A (5), 10, 7, 1 (3 each) and just 6 others.
N.B. For A they need to go beyond pointing out that this is a bowl to catch the blood as it pours out (1 point). The key point to bring out is the fact that no tourniquet has been applied (4 points). This has been omitted on purpose and is thereby passing very critical judgement on the surgeon’s competence.
Below is a list of the sorts of points that could earn marks (in no particular order other than as as spoken to me by a Y11 student recently).
8. The victim, (sorry I mean patient) – is held by a strong attendant.
6. His left leg is tied by a rope to the leg of a chair.
10. The surgeon is wearing protective sleeves (this would have been a familiar image to 18th century readers and signifies a butcher at work). Students can’t be expected to know this but they won’t forget it. (Harder).
7. The leg the surgeon is cutting doesn’t seem to be particularly in need of amputation. Note it is being bent quite powerfully by the patient! (Harder).
1. The bag of surgeon’s tools clearly includes a large bone (a thigh bone or femur from a previous operation carelessly left behind?) The bag’s contents are spilled over the floor suggesting carelessness? (Harder)
4. No concern is being shown for the patient. The man at the back even uses the patient’s head for support so that he can get a better look.
5. Guy to the right in tricorn hat and wig is wearing a sword. This is a brutal operation.
11. The assistant is not really helping, other than holding a knife for the next operation and a crutch for the patient’s use.
2. The surgery seems to be used for both dissecting dead bodies and for operating. (Important)
3. You can see the skeleton’s almost moving in sympathy with the patient!
9. To the top right is a list of surgeon’s names (provided on PowerPoint slide 4) – can the students read any? They’ll be amused by some of the names.
At that time, 1785, there was no form of anaesthetic or antiseptics, but even so no form of sedation, e.g. opiates, is being used. There is no tourniquet even. No-one shows any care for the patient. It is as if he is just an animal being butchered. Even the list of ‘approved’ surgeons is poking fun at the dubious nature of the surgeon’s art.