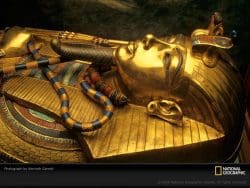
The opening of Tutankhamun’s tomb: a brilliant reconstruction relay
The activity that forms the basis of this lesson is called reconstruction relay. It is GUARANTEED to enthuse even the most recalcitrant Y4 boy! Pupils have to travel down a tunnel of tables to see pictures of the inside of Tutankhamun’s tomb. They must concentrate on memorising what they see as the gases inside the tomb only allow them 10 seconds before they must rush back and draw what they saw. Fortunately they are in team of four, so they should manage to get all the details drawn in the time. But what are the objects they have just drawn and why are they in the boy kings tomb?
Learning objectives
- pupils experience a sense of awe and wonder at finding these undiscovered ancient riches
- they are able to accurately observe and represent in a quick field sketch the objects left in the tomb
- they work co-operatively in order to generate relevant historical questions
Getting Started
Use the following steps in conjunction with the provided resources below to deliver the lesson. It is recommended that you practise a couple of times to discover how these instructions will best fit your style of teaching. Please note that you will need to supply images, or relic artefacts of the tomb contents.
Step 1
The starter for the lesson is an activity called reconstruction relay. It works like this. You are trying to recreate the atmosphere of tension and anticipation back in 1922 when Howard Carter first caught sight of the glorious golden treasures of the boy king’s tomb that had lain undisturbed for some 3,000 years. You are turning a part of the classroom into the chamber leading to the tomb.
To make it really exciting you need to make a few adjustments to the classroom.
Firstly, create a long tunnel by placing tables in a long row covered with cloth. This makes it both dark and exciting. At the end of the tunnel lie the treasures but you will need to find some way of obscuring them so that the pupils experience a real sense of discovery – I am sure that you can think of a cleverer way than I can! Use objects wherever possible, but large posters or colour pictures will do -some are provided on the PowerPoint. Not too many – just enough to be sketched by four pupils. It is important that these images cannot be seen by anyone except when in the tunnel. It works best if you have a dim lamp pointed towards the objects, simulating a crack of light.
Step 2
Pupils work in a team as archaeologists with Carter. All are eager to have a look. But because the passage is narrow, only one person at a time can look. So work in teams of four, numbering each other as 1,2,3,4.
The pupils have just 10 seconds to observe and 10 seconds to sketch before the next member of the team has a go. This acts as a great leveller, as no-one can excel or fail at the activity. It adds a note of authenticity, too, if you tell them that there are nasty gases in the tomb that have built up over thousands of years. Pupils take turns to crawl along the passage until they come to the entrance of the tomb. They then have just 10 seconds to observe as much of the contents of the tomb as they can manage in the time and hold it in their memory until they crawl. For health and safety reasons, pupils must only be in the tomb for 10 seconds. There has been an enormous build up of poisonous gases over thousands of years. You can imagine the characters that emerge from the tunnel coughing and spluttering! See image in image gallery to see two Y4 girls emerging from the tunnel.
The activity works as a relay, with each having 10 seconds to observe and then 10 seconds sketching. After number 1 has drawn they then discuss with number 2 what they might concentrate on. This is repeated until all have had a go. You must keep the pace fast, either counting down yourself, or using a clock on your whiteboard. This is an occasion when the speed really adds to the fun.
Step 3
At the end I ask them to nominate ONE person who might go back and have one last look. They then work together to compose their final picture.
It is important at this stage NOT to look at their pictures. What matters is simply their interest in the objects.
Step 4
When all sketches have been finished, show them slides 2,3,4 and 5. These show Howard Carter peering into the chamber, a diagram of the layout of the tomb and then a description of what Howard Carter said on first seeing the tomb goods (continued on slide 11 if you need extra detail). Tell the children that they are going to meet a man who has the job of interpreting the finds at the British Museum. He is very willing to tell the children what they want to know.
Step 5
The children will no doubt be curious about what happened. So, for three minutes children have to come up with as many of their own good questions as they can in groups of four. Groups then compare questions. We have only very limited time with the curator so we can ask only five questions. Which are the five best questions in the class?
Step 6
You, the teacher, are to go in role as a curator answering pupils’ questions as best you can. But the curator is going to be 20 minutes late. In the meantime, can we see how many of our own questions we can find the answer to? We can use the intranet (where suitable files have been collected); a set of library books a video programme and a few assorted class texts.
Resource
You then arrive in role, suitably attired with perhaps a trowel showing that you are an archaeologist and do your best to answer their questions. This forms the basis of the next session.
Further reading and Resources
National Geographic – The Excavation of Tutankhamun’s Mummy | King Tut in Color
The British Museum’s Ultimate Activity Book on Tutankhamun tells the amazing story of his life and death and discovery of his tomb. Children can press out and make their own accurate model of the tomb.
Written by Hendrikje NouwensSBN 97807 141 30385 it contains 32 pages, 50 colour pictures and retails.

